Migrate WordPress website from DreamHost to Cloudways
Moving from DreamHost to Cloudways is not that difficult – if everything works out smoothly. The migration part itself is not challenging, however, there are some things to consider if you want to perform the full migration inclusive all the necessary steps to run the site securely, i.e. SSL certificate, HTTPs. DreamHost also comes with a free email service that is not included in Cloudways. If you use email by DreamHost it might be necessary to take care of an additional migration of your email mailbox. This article includes a step by step guide for the full DreamHost to Cloudways WordPress migration. The migration of the email mailbox is not included in this article, thus the focus will be on moving files, moving the database, getting a new Let’s Encrypt SSL certificate, and making the website via HTTPs securely available, and setting all the DNS records as needed.
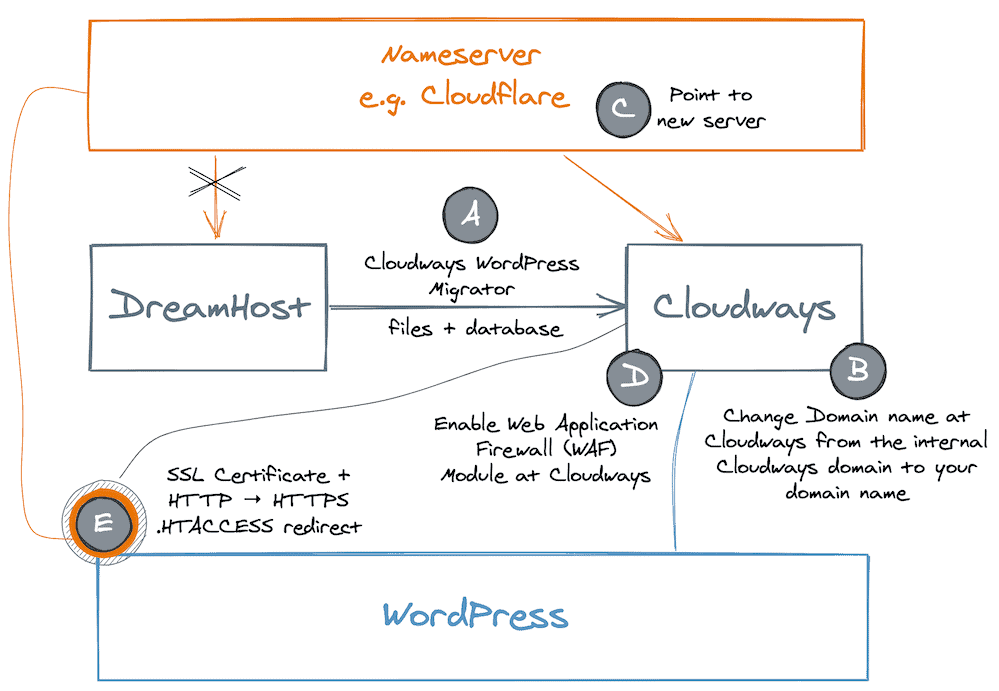
Step by step guide to migrate your WordPress site to Cloudways
Preparation: Set up a Cloudways server and add the WordPress application
A) Mandatory: Migrate files and database from DreamHost to Cloudways
B) Mandatory: Change domain at Cloudways platform
C) Mandatory: Change DNS records at your nameserver
D) Optional: Web Application Firewall WAF Module
E) Highly recommended: Take care about SSL certificate and HTTP to HTTPs forwarding
F) Check WordPress settings, plugins, caching and test site
G) Optional: Change DNS settings at nameserver for email server
Preparation: Set up a Cloudways server and add the WordPress application
Before you start with the migration process be sure to have your Cloudways server up and running. It takes only a few clicks to add a new WordPress application from scratch to a Cloudways server. In a few minutes, you are able to access a fresh WordPress frontend and backend. However, if you perform the migration with the recommended Cloudways WordPress Migrator there is no need to access the actual WordPress site beforehand.
There are other methods to migrate the content as well, and I will give a quick overview on the next step.

A) Migrate files and database from DreamHost to Cloudways
There are different approaches on how to migrate the content, i.e., the files and database from the DreamHost server to the Cloudways server. Depending on the selected migration method there are small differences you should consider.
- Entirely manual approach: copy files via SFTP, set file and folder permission, export database at DreamHost and import database at Cloudways, adapt WordPress configuration files
- Plugin Duplicator: requires empty root folder
public_htmland database at Cloudways; allows up to 500MB in size for the free version - Plugin Duplicator Pro: no need for empty root folder
public_htmland database at the destination - Plugin Cloudways WordPress Migrator: recommended method to migrate to Cloudways

Cloudways WordPress Migrator is a recommended and convenient solution
The easiest way to run the migration is by installing the Cloudways WordPress Migrator at the DreamHost WordPress instance (source).
Find all the data you need for the Cloudways WordPress Migrator at your Cloudways Panel → Application Management → Access Details. If you do not want to use the Master Credentials for SFTP you can create SFTP credentials for each individual WordPress application.
Start the Cloudways WordPress Migrator at DreamHost and fill in the required data:
- Email address (same email address used in Cloudways)
- Server IP address
- Application URL
- DB name
- SFTP username and password
After you filled in all the details click on Migrate to copy the files and database from DreamHost to Cloudways.

Congratulations! The content is migrated successfully. Nothing changed at DreamHost yet, which means your public site is still accessible and looks exactly the same as before. However, the migrated copy exists now at Cloudways and can be accessed via the temporary URL provided on the Cloudways platform.

To guarantee that caches of the default WordPress setup are cleared at Cloudways go to your Cloudways Panel → Server Management → Manage Services and clean the Varnish cache by clicking on Purge.

Now you are ready to look at your migrated site at Cloudways. You can find the temporary URL at your Cloudways Panel → Application Management → Access Details.

Optional: In case of problems use the Duplicator plugin instead of the Cloudways WordPress Migrator
If there are problems with the very convenient and recommended Cloudways WordPress Migrator I recommend using the free Duplicator plugin. The free version supports package sizes up to 500MB. If the website is larger than that it is possible to split up the packages (files, database) or move to Duplicator Pro.

Basic instructions for Duplicator if needed:
- Install at source site (DreamHost)
- Create package and download package + installer.php
- Upload these two files to the destination server’s root folder (it is highly recommended that the root folder, i.e. public_html, is empty)
- Go to the browser and start the migration process by loading the installer.php script (http://newserver/installer.php)
- Add necessary credentials for the database to finish the migration process
More details can be found at: https://snapcreek.com/duplicator/docs/quick-start/
B) Change domain at Cloudways platform
Stay at your Cloudways Platform → select your WordPress application → go to Application Management → Domain Management. In Primary Domain add your domain, e.g. himarkus.com, if you use www with your domain.
You can also just add himarkus.com or any sub-domain, e.g. blog.himarkus.com
In Additional Domains you can add aliases or subdomains or additional domains if you use a WordPress Multisite.

C) Change DNS records at your nameserver
The next step is essential as it is the time when you let your domain name point to the new Cloudways server. The changes must happen at your nameserver. I usually recommend to use Cloudflare, however, you might have your own nameserver. The following changes must happen at your nameserver.
Option I: Change DNS records with Cloudflare as nameserver
Even though my domain provider is Namecheap I use Cloudflare as my CDN (content delivery network) and nameserver, thus in my case, that is the place to change my DNS settings. There will be probably many records from DreamHost and it will look like the following screenshot. However, to make the domain name point to the new hosting provider Cloudways we initially only need to change a few of the records (in yellow and orange in the screenshot).

Get the public IP address of your Cloudways server in the Cloudways Panel → Application Management → Access Details → Application Credentials.
Head over to Cloudflare: I recommend taking a readable screenshot of the current DNS records. At first, I suggest to leave mailbox and email records (in green) as is and just change ftp, root (e.g. himarkus.com), mysql, www and point all of those to the new server at Cloudways. If everything works well you can come back later and delete all email related records in green.
Understand: For easier understanding, I refer to the Cloudways server. Of course, Cloudways itself is only a service itself and runs on other cloud provider’s infrastructure, e.g. Linode, Vultr, Digitalocean, AWS, Google Cloud.
Note: Depending on the plan at DreamHost the current server IP address for ftp, root, www, ssh can be different from mysql as MySQL runs on a different server. If you have a dedicated server at DreamHost (instead of a shared server or virtual private server – VPS) this would be the same IP address for all services. Cloudways (at least with Digitalocean) works differently and runs all services on the same virtual server)
Option II: Change DNS records without Cloudflare as nameserver
If you do not use Cloudflare you need to do pretty much the same and change the DNS records at your actual nameserver. Look up https://www.whois.net to learn more about your name server.
Go to your domain provider, where your domain is registered, and point the DNS to Cloudways. Find instructions on how to do this with Namecheap or DreamHost or GoDaddy. Other domain providers should work similarly.
Please understand that changes at your domain provider can take up to 24 hours to propagate worldwide. You can check the propagation status at https://www.whatsmydns.net/#A

D) Optional: Web Application Firewall WAF Module
If you want to be able to see the visiting users’ real IP address instead of the Web Application Firewall, e.g., Cloudflare. Go to your Cloudways Platform → Server → Server Management → Settings & Packages → Advanced → WAF MODULE and set it to Cloudflare.

E) Highly recommended: Take care of SSL certificate and HTTP to HTTPs forwarding
I always recommend fully securing your site. This does not only protect the data that is transmitted between the visitor and your web server but also has an impact on SEO and therefore the Google search rankings.
Step 1: Disable Cloudflare and register Let’s Encrypt certificate at Cloudways
Step 3a: Change SSL/TLS encryption mode to Full (strict) at Cloudflare
Step 3b: Enable Automatic HTTPS Rewrite and always use HTTPs at Cloudflare
Step 4: Enable the HTTPS Redirection at Cloudways
Step 5: Change URL in WordPress from HTTP to HTTPS
Step 6: Add redirect rule to .htaccess (or migrate .htaccess from old server)
Step 7: Fix mixed content of previously uploaded images and URLs
Step 1: Disable Cloudflare and register Let’s Encrypt certificate at Cloudways
Cloudways supports Let’s Encrypt and custom SSL certificates. You can either create a free SSL certificate (choose the Let’s Encryption SSL option) or deploy a Paid SSL certificate for your applications (choose an option from Custom SSL).
In our case we are using the free Let’s Encrypt SSL certificate. As I use Cloudflare I must disable it first by going to Cloudflare Dashboard and “Pause Cloudflare on Site”. If you do not want to fully disable Cloudflare you can also head over to Cloudflare → DNS and temporarily disable Cloudflare for www and root (himarkus.com) address.

As soon as you (temporarily only for this step) disabled Cloudflare you can install the Let’s Encrypt SSL certificate. Go to Cloudways Platform → Application Management → SSL Certificate and add register the Let’s Encrypt SSL certificate to your domain.
Now, you have two different choices to make, whether you want to cover a single domain or multiple domains with an SSL certificate. Here, a single domain means one domain only such as example.com. Whereas, multiple domains refer to additional domains and subdomains such as example.com, www.example.com, store.example.com, etc. or simply wildcard e.g., *.example.com.
Before deploying the SSL certificate on the multiple domains, please ensure that all your additional and subdomains must point to your Cloudways’ server; otherwise, the SSL certificate will not be installed.
For multiple domains, you can use a Multi-domain (SAN) certificate or a wildcard certificate. A Wildcard Certificate allows you to secure the root domain and multiple subdomains with just one certificate without listing down and declaring all your subdomains. In many cases, the Wildcard Certificate makes more sense than a Multi-domain (SAN) certificate because it allows unlimited subdomains, and you don’t need to redeploy the SSL certificate if you want to add more subdomains in future. Read more about the Wildcard SSL Certificate here at Cloudways.


Step 2: After successful Let’s Encrypt certificate registration re-enable Cloudflare + add the CNAME at Cloudflare
Enable Cloudflare again and add the CNAME record to Cloudflare as instructed in Cloudways.

Step 3a: Change SSL/TLS encryption mode to Full (strict) at Cloudflare

Step 3b: Enable Automatic HTTPS Rewrite and always use HTTPs at Cloudflare


Step 4: Enable the HTTPS Redirection at Cloudways
Securing a website with an SSL certificate is not enough to protect your website as intruders can still access your website on an unsecured HTTP protocol just by typing http:// before your website URL.
After the SSL certificate is registered, the CNAME added, Cloudflare’s SSL/TLS encryption mode is set to full (strict) – you want to take care of one last step. Redirect all requests from HTTP to HTTPS to guarantee secured sites.
You can check the status here later: https://www.sslshopper.com/ssl-checker.html
For more information you can look up the Cloudways documentation.
Note: If you use any Web Application Firewall (WAF) services such as Cloudflare, Sucuri, etc or if you have implemented HTTPS redirection already using any application plugin, or by modifying .htaccess file of your application, then you do not need to force HTTPS redirection again from the Cloudways Platform to avoid your website running into redirection loops. But, if you want to force HTTPS redirection from the Cloudways Platform, then you need to disable any redirection mechanism working elsewhere first.

Step 5: Change URL in WordPress from HTTP to HTTPS
Go to the WordPress backend of the new site (the one that runs on the Cloudways web server). Use the username and password that you used beforehand at DreamHost (the user credentials got migrated as well).
Go to Settings → General and add s to the http:// links in the WordPress Address (URL) and the Site Address (URL).

If you do not have access to the WordPress backend you can change the WordPress Address and Site Address URL in the wp-config file:
define( 'WP_HOME', 'https://example.com' );
define( 'WP_SITEURL', 'https://example.com' );
Step 6: Add redirect rule to .htaccess (or migrate .htaccess from old server)
The htaccess file is the first file you want to have a look at when it comes to your web server configuration. When you added a new server in Cloudways and added your first WordPress app, the default configuration of the web server was loaded and saved in the htaccess file.
After successful migration, you want to have a look at the htaccess file at DreamHost to see if any custom configuration must be transferred to the new web server at Cloudways. That means that the previously custom added configuration at DreamHost is gone, and it must be added again at Cloudways.
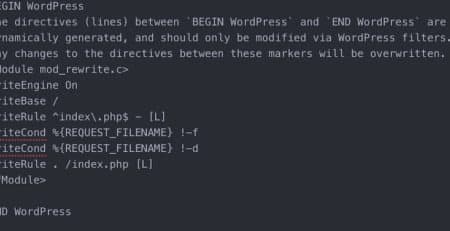
Alternatively, you will find the previous htaccess file of the DreamHost web server on your Cloudways web server. It was not deleted during the migration process but renamed and therefore backed up. It should have a filename similar to the one you can see on the screenshot, e.g. htaccess.bv.8912

Definitely be sure that you add the following rewrite rule to your htaccess to guarantee redirects from HTTP to HTTPs.
Cloudways force HTTPs (find other rewrite rules for Cloudways in the Cloudways documentation)
RewriteEngine On
RewriteCond %{HTTP:X-Forwarded-Proto} !https
RewriteRule ^(.*)$ https://%{HTTP_HOST}/$1 [R=301,L]
DreamHost force HTTPs (do not use at Cloudways)
RewriteEngine On
RewriteCond %{HTTPS} !=on
RewriteRule ^(.*)$ https://%{HTTP_HOST}%{REQUEST_URI} [L,R=301,NE]
Note: we forced the HTTP to HTTPs redirect within Cloudways in Step 4 – perhaps, in this case, it might work correctly even without this specific rules in htaccess.
Note: If you are using any WAF services such as Cloudflare, Sucuri, etc or if you are implementing any Custom HTTPS redirection using any application plugin, or by modifying .htaccess file of your application, then you do not need to force HTTPS redirection from Cloudways Platform because your website may run into errors or get stuck in redirection loops because of too many redirects. But, if you want to force HTTPS redirection from the Cloudways Platform, then you need to disable any redirection mechanism working elsewhere first and then follow this article for guidance.
You can read more about htaccess to better understand what is happening in there.
Step 7: Fix mixed content of previously uploaded images and URLs
Mixed content is a bit annoying. Simply said this means that the source code of one of your pages or posts contains old HTTP URLs instead of HTTPs URLs.
Better Search Replace is the most popular tool to use to replace HTTP URLs with HTTPs URLs.
After installing and activating the plugin go to Tools → Better Search Replace.
In the Search for field, add the http:// version of your domain.
In the Replace with field, add the https:// version of your domain.
Select all tables and check the results first as a try run (no actual changes are going to happen to your database). Before performing an actual search/replace run be sure to have a backup of the database. As you just migrated over from DreamHost I assume in the worst case you will still have access to your database at DreamHost.

Summary of getting your site fully secure
There are different security layers and it depends on your overall setup which one you need. Not always it is necessary to enable all security layers, however, I try to activate as many as possible without getting into redirects.
- Cloudways Let’s Encrypt SSL certificate
- Cloudflare SSL/TLS encryption mode full (strict)
- Cloudflare automatic HTTPs rewrites and always use HTTPs
- WordPress configuration Address and Site Address URL set to HTTPs
- Cloudways force HTTPs
- Cloudways .htaccess redirect/force HTTPs
- WordPress avoid any HTTP URLs
F) Check WordPress settings, plugins, caching and test site
Wow! If you made it till now it means you took care of really everything, including providing a secure website. Now it is time for testing.
Some plugins write into the web server configuration (htaccess) and WordPress configuration (wp-config) files. If you want to be sure that all the necessary entries of those plugins are in your htaccess and wp-config file, I recommend to disable all plugins one time in bulk and re-enable them again.
Next, purge all the caches your website depends on → 1) cache at WordPress plugins, 2) cache at Cloudflare, 3) cache in your browser e.g. Google Chrome or Firefox

After clearing the cache click through your sites and check if all the sites are loaded correctly, and if you get the green padlock 🔒 icon in your browser’s address bar. The padlock signals that the site is loaded via SSL/HTTPs and no mixed content is loaded.
G) Optional: Change DNS settings at nameserver for email server
If you did not use the email service of DreamHost you can just delete the records at your nameserver (Cloudflare or your nameserver of your domain provider).
If you use the email service of DreamHost I recommend to migrate the mailbox to a new provider before quitting the DreamHost account and deleting the DNS records.

Enjoy the Cloudways performance, price and service
You made it! I know the complete guide included many steps. However, I believe it is better to have one complete guide that allows you to skip over some steps than a guide with many missing steps. In my next guide, I will show you which email services I recommend for Cloudways and how to make them work with your domain. One email solution is available as a Cloudways add-on and costs 1 USD per mailbox per month, the other solution is completely for free for up to 5 mailboxes.
Let me know if you came across any problems and I am happy to help you with your migration process. If you are new to Cloudways and only want to migrate one single website you can also use the Cloudways migration service – the first migration will be done by Cloudways itself for free.